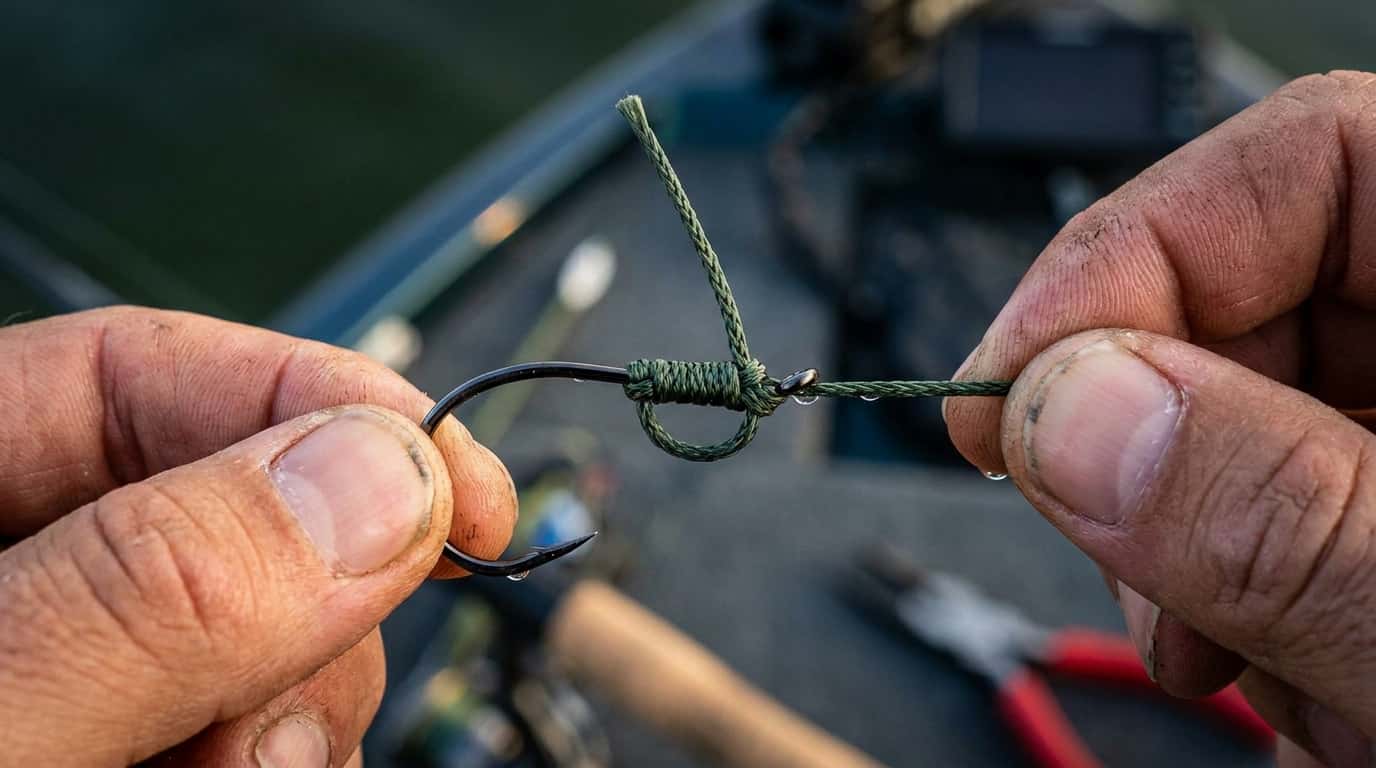
Landing a fish often comes down to a single detail: the knot at the end of your line. You can have the best rod, the sharpest hooks, and the right bait, but if your knot fails, you lose the fish—sometimes the fish of a lifetime. Knot strength matters because the stress of a fight, a sudden sharp pull, or even just the friction of casting can cause a weak knot to slip or break. Many anglers have a story about “the one that got away” because their knot didn’t hold. Learning to tie strong, reliable knots isn’t just a skill—it’s the difference between success and failure in fishing.
This guide will show you exactly how to tie the 10 most useful fishing knots, when to use each one, and how to avoid the mistakes that cost fish. Each knot is explained step by step, with tips and examples for real fishing situations. Whether you’re a beginner or looking to improve your skills, you’ll find practical advice, simple instructions, and insights that even experienced anglers sometimes miss. By the end, you’ll know which knot to use, how to tie it, and how to trust it when that big fish bites.
What Makes A Good Fishing Knot?
A good fishing knot is more than just a twist and pull. It combines strength, reliability, and ease of tying. When you tie a knot, it creates a weak spot on your line, but the right knot minimizes this weakness. The best knots hold their strength under sudden force, don’t slip under pressure, and are easy to tie even when your hands are wet or cold.
There are three main things to look for:
- Knot strength – This is how much force the knot can handle before breaking. The best knots keep at least 80-90% of the line’s original strength.
- Security – A secure knot doesn’t slip or come undone, even after repeated casting, fighting fish, or getting snagged.
- Practicality – Can you tie it quickly and easily? Some knots work better for certain types of line (like braid, mono, or fluorocarbon) or specific fishing situations.
One non-obvious factor is knot size. A smaller knot passes through rod guides more easily, reducing casting friction and preventing tangles. Another insight: the way you tighten (or “seat”) the knot can affect its strength by up to 20%. Wetting the knot with saliva or water before pulling tight reduces friction and helps the knot cinch down smoothly, keeping the line from weakening.
A knot’s shape also matters. Round, compact knots are less likely to snag or catch debris, while longer or bulky knots can create problems during casting or retrieval. For example, knots like the Nail Knot are designed to be slim for fly fishing, where smooth passage through the guides is crucial.
Many anglers overlook compatibility between the knot and the line type. Some knots are great for monofilament but fail with braid, which is much more slippery. The Uni Knot and Palomar Knot, for example, are known for their versatility and strength on multiple line types.
Understanding these basics helps you choose the right knot for your tackle, the fish you’re targeting, and the water conditions. Now, let’s look at the most important knots every angler should know.
Knot 1 — Improved Clinch Knot (best For Beginners)
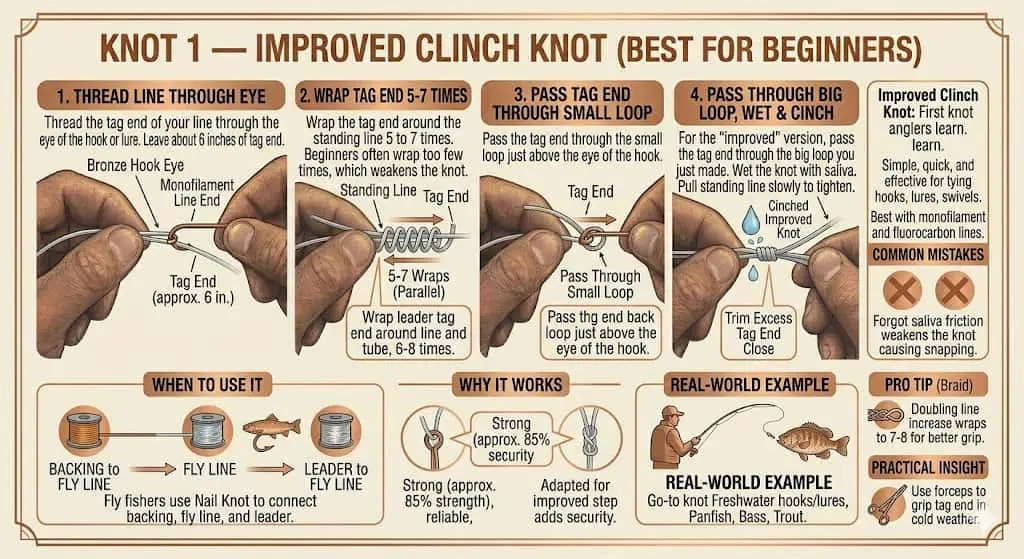
The Improved Clinch Knot is often the first knot anglers learn. It’s simple, quick, and effective for tying hooks, lures, or swivels to your line. It works best with monofilament and fluorocarbon lines.
When To Use It
- Tying on hooks, snaps, or lures
- Light to medium tackle
- Monofilament or fluorocarbon line
The Improved Clinch Knot is popular for trout, panfish, and bass fishing, especially when using light tackle. For freshwater fishing, it’s a go-to knot for attaching small hooks and lures.
How To Tie The Improved Clinch Knot
- Thread the tag end of your line through the eye of the hook or lure. Leave about 6 inches of tag end.
- Wrap the tag end around the standing line 5 to 7 times. Beginners often wrap too few times, which weakens the knot.
- Pass the tag end through the small loop just above the eye of the hook.
- For the “improved” version, pass the tag end through the big loop you just made.
- Wet the knot with saliva. This step prevents friction burns and keeps the knot strong.
- Pull the standing line slowly to tighten. The coils should snug down neatly.
- Trim the excess tag end close to the knot.
Why It Works
The improved clinch knot is strong (about 85% line strength) and reliable if tied correctly. Many beginners miss the “improved” step—passing through the big loop—which adds extra security.
Pro Tip
If you’re using braided line, double the line through the eye and use 7-8 wraps. Braided line is slippery, so more wraps mean more grip.
Another practical insight: If you are tying the knot in cold weather or with gloves, you can use a pair of forceps to help grip the tag end and pull it through the loops. This helps when your fingers are numb and you need precision.
Common Mistakes
Many beginners forget to wet the knot, which can cause the line to weaken and snap. Another mistake is not pulling the coils evenly; if the wraps are not tight and parallel, the knot can slip or break under pressure.
Knot 2 — Palomar Knot (strongest Hook Knot)
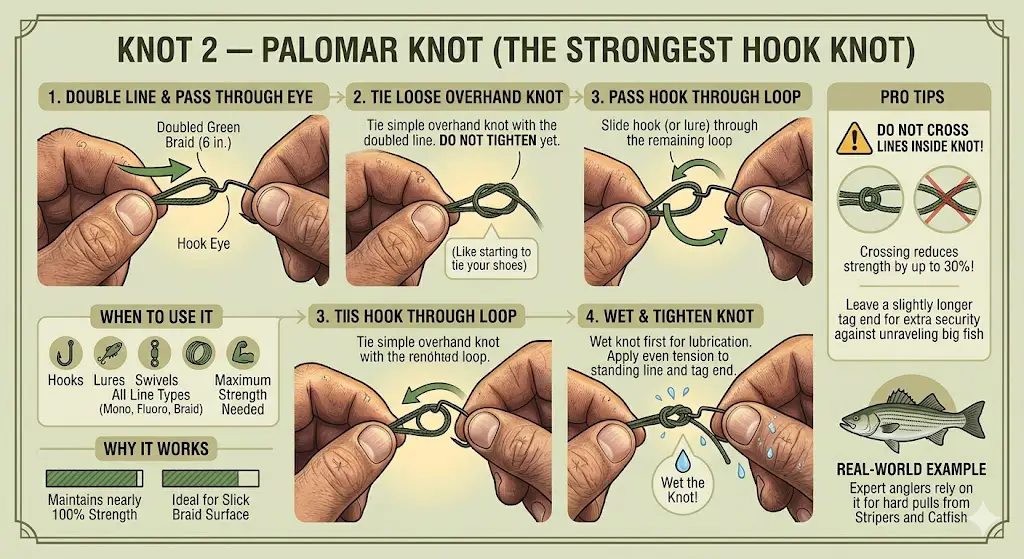
The Palomar Knot is known for its strength and simplicity. Many expert anglers consider it the most reliable knot for tying hooks, especially with braided line.
When To Use It
- Tying hooks, lures, or swivels
- All line types (mono, fluoro, braid)
- When maximum strength is needed
The Palomar Knot is a favorite in bass fishing tournaments. It’s also widely used in saltwater fishing, especially when targeting strong, fast fish like redfish or snook. Its simplicity makes it ideal for quick changes in fast-paced environments.
How To Tie The Palomar Knot
- Double about 6 inches of line and pass the loop through the hook eye.
- Tie an overhand knot (just like starting to tie your shoes) with the doubled line, but do not tighten yet.
- Pass the hook (or lure) through the loop.
- Wet the knot and pull both the standing line and tag end to tighten evenly.
- Trim the tag end.
Why It Works
The Palomar Knot maintains nearly 100% of the line’s original strength. It’s less likely to slip and works well with all line types, especially the slick surface of braid.
Pro Tip
Make sure the lines do not cross each other inside the knot. Crossing can reduce strength by up to 30%. If you’re tying on a large lure, make a bigger loop to slide it over the lure easily.
For extra security, leave a slightly longer tag end. If you catch a big fish, the knot may slip a bit, but the extra tag prevents it from unraveling.
Real-world Example
When fishing for heavy catfish or stripers, many anglers use the Palomar Knot because it stands up to hard pulls and sudden runs. In these situations, the knot’s strength can mean the difference between landing a trophy and losing your catch.
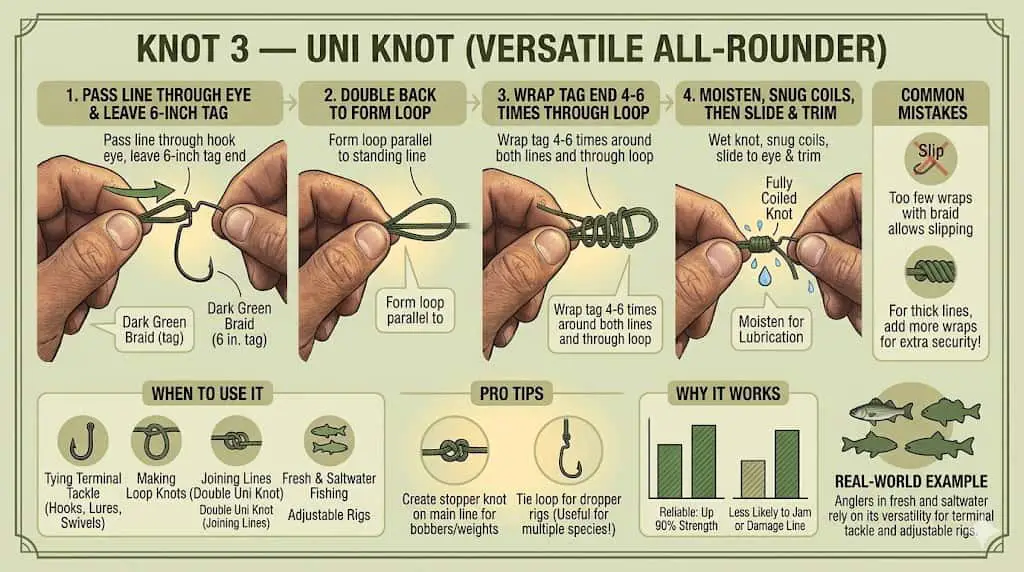
Knot 3 — Uni Knot (versatile All-rounder)
The Uni Knot is highly versatile. You can use it for tying hooks, making loops, or joining lines. It’s strong, easy to learn, and works with all line types.
When To Use It
- Tying hooks, lures, and swivels
- Making loop knots
- Joining two lines (double uni knot)
- All line types
The Uni Knot is popular with anglers who fish in both fresh and saltwater. It’s used for tying terminal tackle but also for creating stopper knots or sliding knots for adjustable rigs.
How To Tie The Uni Knot
- Pass the line through the eye of the hook, leaving a 6-inch tag end.
- Double back to form a loop alongside the standing line.
- Wrap the tag end around both lines and through the loop 4 to 6 times.
- Moisten and pull the tag end to snug the coils.
- Slide the knot down to the eye and pull tight. Trim the tag end.
Why It Works
The Uni Knot is reliable and holds up to 90% of line strength if tied carefully. It’s less likely to jam or damage your line than some other knots.
Pro Tip
Use the Uni Knot for making a stopper knot by tying it onto itself (just around the main line) to keep bobbers or weights in place. This is a trick many beginners don’t know.
Another advanced trick: The Uni Knot can be used to tie a loop for attaching dropper rigs, which are useful when fishing for multiple species at once.
Common Mistakes
If you use too few wraps, especially with braid, the knot can slip. For thick lines or heavy tackle, add more wraps for extra security.
Knot 4 — Blood Knot (joining Two Lines)
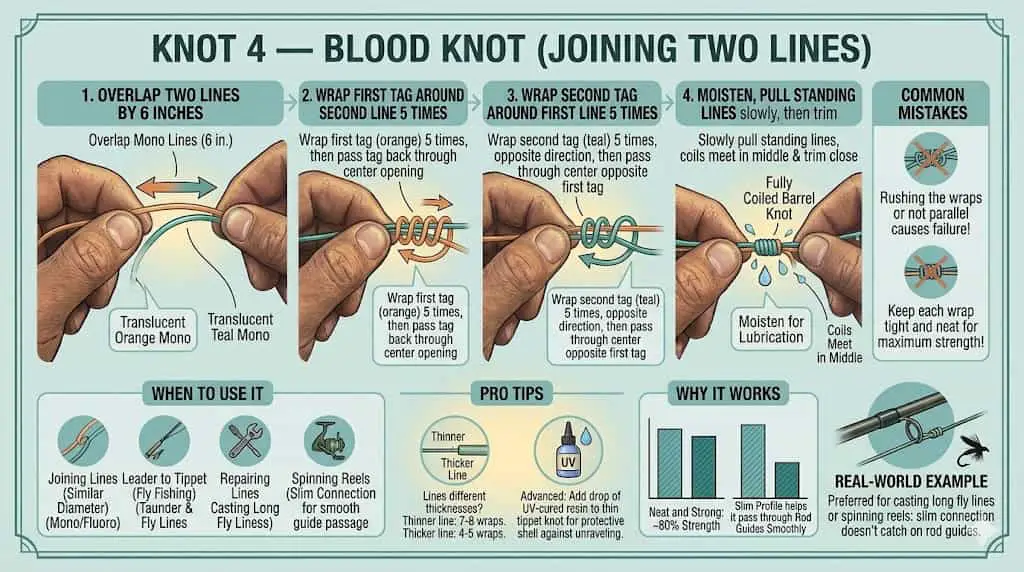
The Blood Knot is the classic choice for joining two similar-diameter lines. Fly fishers use it to connect leader to tippet, but it’s also useful in other types of fishing.
When To Use It
- Joining two lines of similar diameter (mono or fluoro)
- Making longer leaders or repairing lines
The Blood Knot is preferred in situations where you want a slim connection that doesn’t catch on rod guides, such as when casting long fly lines or spinning reels.
How To Tie The Blood Knot
- Overlap the two lines by 6 inches.
- Wrap the first tag end around the second line 5 times.
- Pass the tag end back through the center, between the two lines.
- Wrap the second tag end around the first line 5 times in the opposite direction.
- Pass this tag end through the center in the opposite direction.
- Moisten and pull both standing lines slowly until the knot draws tight and the coils meet in the middle.
- Trim both tag ends close.
Why It Works
The Blood Knot is neat and strong (about 80% line strength). Its slim profile helps it pass through rod guides smoothly—important for fly and spinning setups.
Pro Tip
If the lines are different thicknesses, make more wraps with the thinner line (7-8 times) and fewer with the thicker one (4-5 times).
Another advanced tip: For extra strength, especially with thin tippet, you can add a drop of UV-cured resin to the knot after tying. This creates a protective shell that keeps the knot from unraveling.
Common Mistakes
Rushing the wraps or not keeping them parallel can cause the knot to fail. Make sure each wrap is tight and neat for maximum strength.
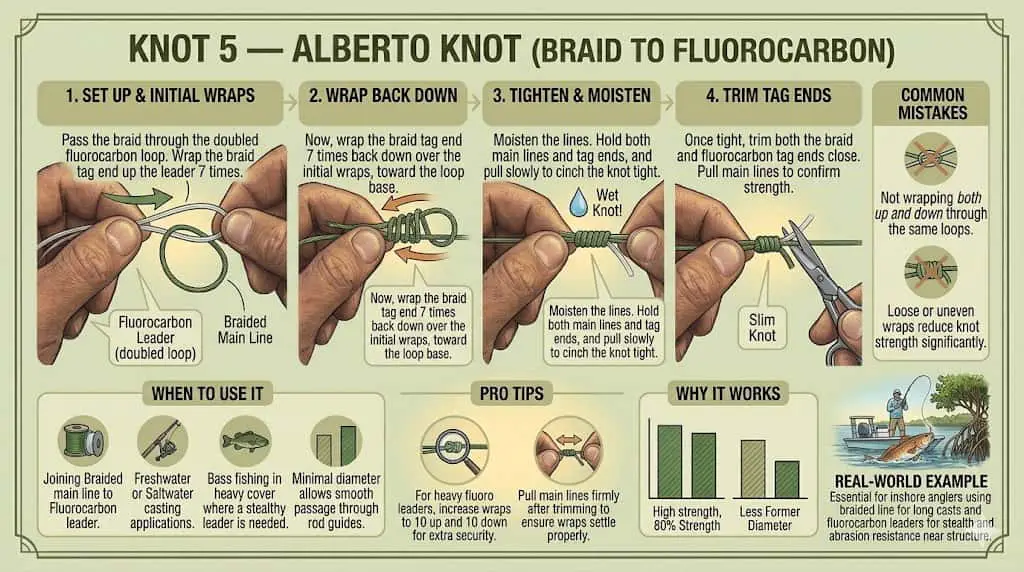
Knot 5 — Alberto Knot (braid To Fluorocarbon)
The Alberto Knot was created for joining braided line to fluorocarbon or monofilament leaders. This connection is often the weakest link in modern setups—unless you use the right knot.
When To Use It
- Joining braid to fluorocarbon or mono leader
- Saltwater and freshwater fishing
This knot is especially popular among bass and saltwater anglers who use braided mainline with a fluorocarbon leader for abrasion resistance and stealth.
How To Tie The Alberto Knot
- Fold the fluorocarbon leader to make a small loop.
- Run 8-10 inches of braid through the loop.
- Wrap the braid around both legs of the loop 7 times going away from the leader.
- Then wrap it 7 times back toward the loop.
- Pass the tag end of the braid back through the loop, entering the same way it came out.
- Wet the knot and pull both braid and leader to tighten.
- Trim both tag ends close.
Why It Works
The Alberto Knot is slim but extremely strong (often 95% or more of line strength). It doesn’t jam in the rod guides and creates a smooth transition between lines.
Pro Tip
Always tighten slowly and evenly. If you rush, the wraps can overlap and weaken the knot. Some anglers color the last inch of braid with a black marker—if the knot slips, you’ll see the color move, which is a great early warning.
Another insight: You can use the Alberto Knot for connecting heavy shock leaders to light braid when surf fishing. This prevents break-offs from aggressive strikes.
Common Mistakes
If the braid doesn’t pass back through the loop exactly the same way it entered, the knot can unravel. Always double-check before tightening.
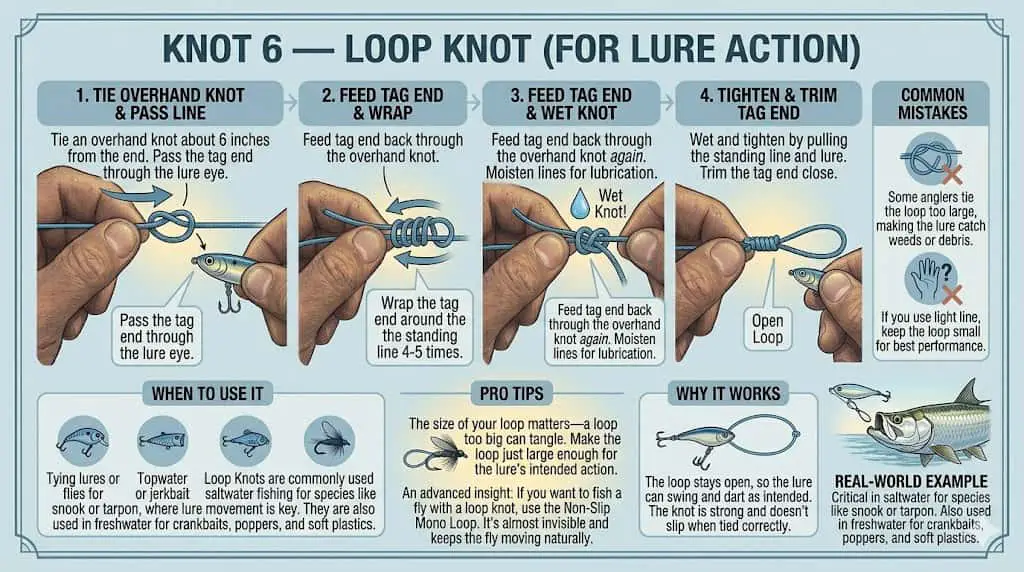
Knot 6 — Loop Knot (for Lure Action)
The Loop Knot allows lures or flies to move freely, giving them better “action” in the water. This is important when you want to imitate a swimming baitfish or let a jig flutter naturally.
When To Use It
- Tying lures or flies for maximum action
- Topwater or jerkbait fishing
Loop Knots are commonly used in saltwater fishing for species like snook or tarpon, where lure movement is key. They are also used in freshwater for crankbaits, poppers, and soft plastics.
How To Tie The Loop Knot (non-slip Loop Knot)
- Tie an overhand knot about 6 inches from the end of the line.
- Pass the tag end through the hook or lure eye.
- Pass the tag end back through the overhand knot.
- Wrap the tag end around the standing line 4–5 times.
- Pass the tag end back through the overhand knot again.
- Wet and tighten the knot by pulling on the standing line and the hook or lure.
- Trim the tag end.
Why It Works
The loop stays open, so the lure can swing and dart as intended. The knot is strong and doesn’t slip when tied correctly.
Pro Tip
The size of your loop matters—a loop that’s too big can tangle. Make the loop just large enough for the lure’s intended action.
An advanced insight: If you want to fish a fly with a loop knot, use the Non-Slip Mono Loop. It’s almost invisible and keeps the fly moving naturally.
Common Mistakes
Some anglers tie the loop too large, making the lure catch weeds or debris. If you use light line, keep the loop small for best performance.
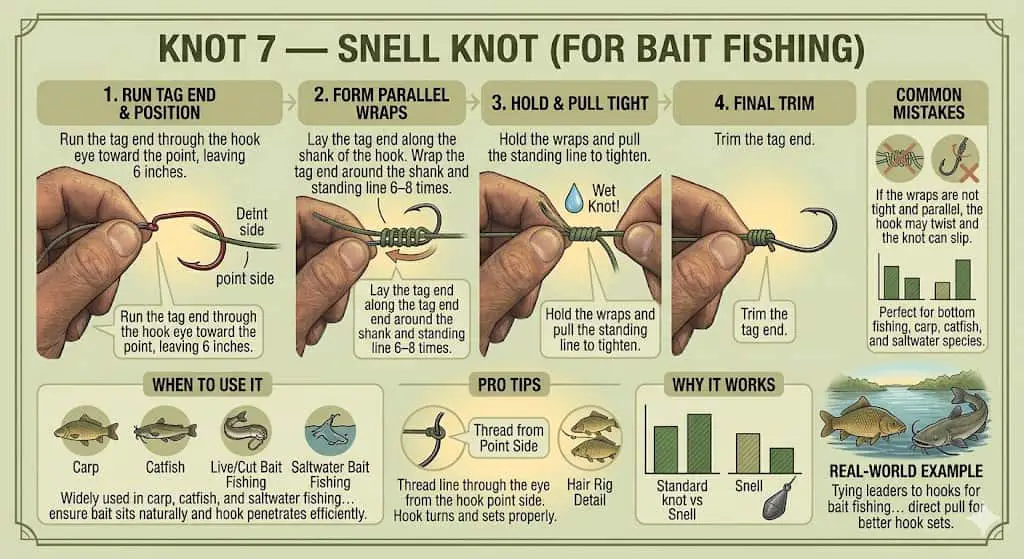
Knot 7 — Snell Knot (for Bait Fishing)
The Snell Knot is perfect for bait fishing, especially with circle or octopus hooks. It keeps the hook in line with the leader, creating a direct pull for better hook sets.
When To Use It
- Tying leaders to hooks for bait fishing
- Circle or octopus hooks
Snell Knots are widely used in carp, catfish, and saltwater fishing, especially when using live bait or cut bait. They ensure the bait sits naturally and the hook penetrates efficiently.
How To Tie The Snell Knot
- Run the tag end through the hook eye toward the point, leaving 6 inches.
- Lay the tag end along the shank of the hook.
- Wrap the tag end around the shank and standing line 6–8 times.
- Hold the wraps and pull the standing line to tighten.
- Trim the tag end.
Why It Works
The Snell Knot aligns the hook perfectly for bait presentation. It’s especially effective for bottom fishing, carp, catfish, and saltwater species.
Pro Tip
Always thread the line through the eye from the hook point side. This ensures the hook turns and sets properly in the fish’s mouth.
Advanced insight: Snell Knots allow for “hair rigs,” where the bait is attached below the hook, increasing catch rates for carp and other species.
Common Mistakes
If the wraps are not tight and parallel, the hook may twist and the knot can slip. Take care to keep each wrap snug and straight.
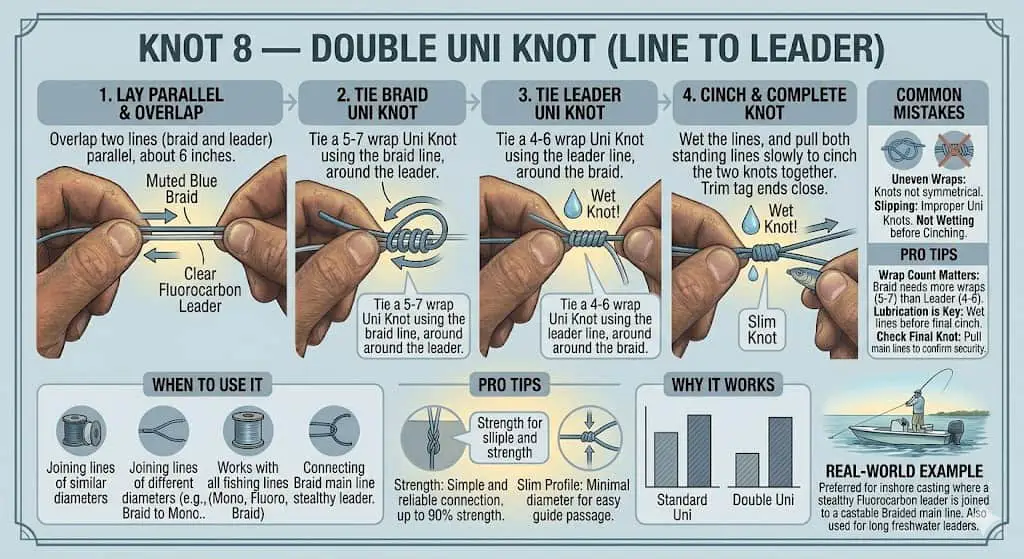
Knot 8 — Double Uni Knot (line To Leader)
The Double Uni Knot is a favorite for joining lines of similar or different diameters. It’s simple, strong, and works with all types of fishing line.
When To Use It
- Joining main line to leader (mono, fluoro, or braid)
- Lines of similar or different diameters
The Double Uni Knot is used in freshwater and saltwater setups, especially when attaching a leader for abrasion resistance or stealth.
How To Tie The Double Uni Knot
- Overlap the two lines by 8 inches.
- Tie a Uni Knot with the first line: Make a loop, wrap the tag end around both lines 4–6 times, and pull to snug.
- Repeat with the second line, wrapping in the opposite direction.
- Pull both standing lines to slide the knots together.
- Trim the tag ends.
Why It Works
The Double Uni Knot keeps 80–90% of the line’s strength and is easier to tie than some other joining knots. It passes through guides smoothly and works for both freshwater and saltwater.
Pro Tip
Increase the number of wraps for thinner or braided lines to improve grip.
Another helpful tip: The Double Uni Knot can be used for tying shock leaders in surf fishing, where you need extra strength to handle long casts and big fish.
Common Mistakes
Not pulling both knots tightly before sliding them together can cause slippage. Make sure each knot is tight and the wraps are neat.
Knot 9 — Surgeon’s Knot (quick Line Joining)
The Surgeon’s Knot is the fastest way to join two lines, especially when your hands are cold or you’re fishing in low light.
When To Use It
- Joining leader to main line
- When a quick, easy knot is needed
- Lines of similar or different diameters
The Surgeon’s Knot is often used for trout fishing, especially when changing tippets frequently. Its speed and simplicity make it perfect for emergencies.
How To Tie The Surgeon’s Knot
- Overlap the two lines by 8 inches.
- Tie a simple overhand knot with both lines together, creating a loop.
- Pass both tag ends through the loop twice (for extra strength, three times).
- Wet the knot and pull all four ends to tighten.
- Trim the tag ends.
Why It Works
The Surgeon’s Knot is strong (up to 80% of line strength) and very fast to tie. It works even if the two lines are slightly different diameters.
Pro Tip
For heavy leaders (like for pike or muskie), make three passes through the loop for more security.
Another advanced trick: You can tie a Surgeon’s Loop (a variation) for attaching dropper flies or adding extra hooks to your rig.
Common Mistakes
If the knot isn’t tightened evenly, it can slip or create weak spots. Always pull all four ends at once to seat the knot.

Credit: wildlife.utah.gov
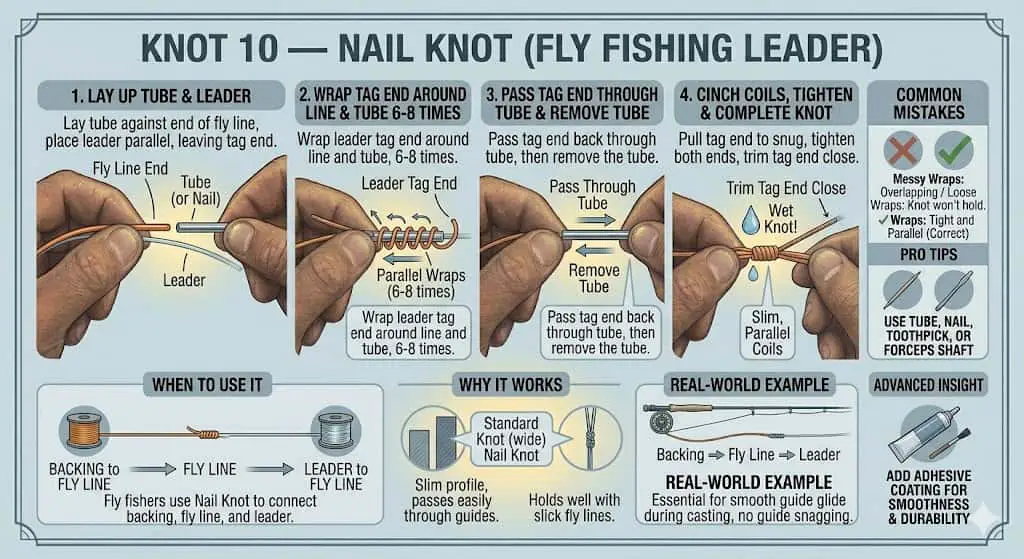
Knot 10 — Nail Knot (fly Fishing Leader)
The Nail Knot is essential for attaching fly line to leader. It creates a slim, smooth connection that glides through guides without snagging.
When To Use It
- Attaching leader to fly line
- Fly fishing setups
Fly fishers use the Nail Knot for attaching backing to fly line and leader to fly line. Its smooth profile prevents hang-ups during casting.
How To Tie The Nail Knot
- Lay a small tube (or nail) against the end of the fly line.
- Place the leader along the tube and fly line, leaving several inches of tag end.
- Wrap the tag end around the fly line and tube 6–8 times.
- Pass the tag end through the tube, then remove the tube.
- Pull the tag end to snug the coils, then pull both ends to tighten.
- Trim the tag end.
Why It Works
The Nail Knot is very slim, passes easily through guides, and holds well even with slick fly lines.
Pro Tip
If you don’t have a tube or nail, use a toothpick, matchstick, or even the metal shaft of your forceps.
Another insight: After tying, some anglers add a thin coat of fly line adhesive to the knot for extra durability and smoothness.
Common Mistakes
If the wraps overlap or are loose, the knot will not hold. Make sure the wraps are tight and parallel before pulling the knot tight.
How To Test Your Knot Strength
Testing your knot strength is critical before you trust it with a big fish. Even the best knot can fail if tied incorrectly or if the line is damaged.
Step-by-step Knot Testing
- Visual inspection: Look for overlapping wraps, kinks, or loose coils. The knot should look neat and tight.
- Wet and seat: Always wet the knot and pull it tight smoothly. A knot that “clicks” or jumps as you tighten is often weak.
- Pull test: Wrap the line around a smooth object (like a pen or dowel) and pull firmly. If the knot slips or breaks, retie.
- Check for slippage: Mark the line with a marker before tightening. If you see the mark move after pulling, the knot is slipping.
Advanced Tip
For critical knots (like braid to leader), test with a small weight—tie the end to a bucket and slowly add weight. Most lines should hold at least 80% of their rated strength at the knot.
Another insight: If you’re fishing for large or aggressive species, test your knot at home before heading out. This prevents costly failures when fishing under pressure.
Example
A 10 lb test line should not break below 8 lbs if the knot is good. If it does, check your technique or try a different knot.
Data Comparison
Here’s how common knots compare for average breaking strength (as a percentage of original line strength):
| Knot | Mono (%) | Fluoro (%) | Braid (%) |
|---|---|---|---|
| Improved Clinch | 85 | 82 | 70 |
| Palomar | 97 | 95 | 95 |
| Uni | 90 | 88 | 85 |
| Alberto | – | 95 | 95 |
| Surgeon’s | 80 | 78 | 75 |
Note: These numbers can vary depending on how well you tie the knot, the brand of line, and other factors.
How To Interpret Knot Strength
If your line breaks at the knot during testing, it’s not always the knot’s fault. Sometimes, the line itself is old, has micro-abrasions, or has been exposed to sunlight and weakened. Always use fresh line for your main setups, especially before important trips.
Practical Tip
Knot strength can also be affected by temperature and humidity. Cold weather makes some lines more brittle, so always check knots before fishing in winter or early mornings.
Common Knot Tying Mistakes
Even experienced anglers make mistakes that weaken knots. Here are some of the most common issues and how to avoid them.
1. Not Wetting The Knot
Friction heats the line and weakens it as you tighten. Always wet the knot before pulling it tight.
2. Not Enough Wraps
Using too few wraps, especially with braid, can cause knots to slip. For slick lines, add extra turns.
3. Overlapping Or Crossing Lines
If the wraps cross over each other or the lines twist inside the knot, strength drops quickly. Keep wraps neat and parallel.
4. Cutting The Tag End Too Short
Leave at least 1/8 inch of tag end. Some knots, like the Uni or Palomar, can slip a little under heavy load.
5. Rushing The Process
Pulling the knot tight too quickly can cause burns or weak spots. Tighten slowly and evenly.
6. Wrong Knot For The Line
Some knots work better with certain lines. For example, the Improved Clinch is not ideal for braid. Choose knots that match your line type.
7. Using Old Or Damaged Line
Knots tied in line that’s nicked, frayed, or UV-damaged will break easily. Cut back to fresh line before tying.
8. Forgetting To Test
Always test your knot before fishing. One quick pull can save you from losing a trophy fish.
Visual Comparison
Here’s a quick look at which knots are best for each line type:
| Knot | Mono | Fluoro | Braid |
|---|---|---|---|
| Improved Clinch | ✔️ | ✔️ | ❌ |
| Palomar | ✔️ | ✔️ | ✔️ |
| Uni | ✔️ | ✔️ | ✔️ |
| Alberto | – | ✔️ | ✔️ |
| Blood Knot | ✔️ | ✔️ | ❌ |
| Double Uni | ✔️ | ✔️ | ✔️ |
| Surgeon’s | ✔️ | ✔️ | ✔️ |
| Nail Knot | ✔️ | ✔️ | – |
Extra Insight
Many anglers think “more wraps equals more strength,” but this isn’t always true. Too many wraps can make the knot bulky and hard to tighten, especially with thick lines. The right number of wraps depends on the line type and the knot.
Frequently Asked Questions
How Do I Know Which Knot To Use?
It depends on what you’re connecting (hook, lure, leader), the type of line, and the fishing situation. For hooks and lures, use the Palomar or Improved Clinch. For joining lines, use the Double Uni or Alberto Knot (for braid to fluoro). If you want more lure action, use a Loop Knot.
Another tip: For fly fishing, the Nail Knot is best for attaching leader to fly line, while the Surgeon’s Knot is ideal for quick tippet changes.
Why Do My Knots Keep Slipping?
This usually happens with braided line or if you don’t use enough wraps. Make sure you’re using the right knot for your line type, add extra turns for braid, and always wet the knot before tightening. Also, check you’re not cutting the tag end too short.
If your knot slips even after these steps, try switching to a knot known for braid, like the Palomar or Double Uni Knot.
How Often Should I Retie My Knots?
Retie after catching a big fish, getting snagged, or whenever your line looks frayed near the knot. Some anglers retie every few hours, especially with abrasive conditions. It’s better to retie too often than lose a fish to a weak knot.
If you’re fishing in rocky areas or around structure, retie more often. Even minor abrasions can weaken the line and the knot.
Can I Use Super Glue On My Knots?
Some tournament anglers use a drop of super glue on certain knots (especially braid to leader) for extra security, but it’s not necessary for most fishing. If you use glue, make sure it doesn’t run into the main line, as this can make it brittle.
An extra tip: Don’t use glue on knots that need flexibility, like loop knots, because it can make the knot stiff and reduce lure action.
Where Can I Find More Diagrams Or Videos For Tying Knots?
Many top fishing sites and YouTube channels have step-by-step videos. For detailed diagrams and GIFs, check resources like the Animated Knots website.
What Should I Do If My Knot Breaks While Fighting A Fish?
First, check the line for damage or abrasions. Cut back to fresh line and retie the knot carefully. Consider switching to a knot with higher strength for your line type, and always wet and seat the knot properly.
Is It Better To Use A Knot Or A Swivel For Joining Lines?
Swivels are useful for preventing line twist, but knots give a more direct connection and often better lure action. For stealth and sensitivity, knots are usually preferred, especially in clear water or when fishing for wary species.
Landing fish comes down to skill, patience, and the right knot. Take a few minutes to practice each of these knots until you can tie them quickly and confidently, even with your eyes closed. This single skill can make you a much more successful angler.
Ready for more? Choosing the right fishing line is just as important as the knot you tie. Explore our complete guide to fishing line types, strengths, and uses—and never lose a fish to the wrong setup again. Tight lines!

Tony L. Smith is a dedicated fishing expert with over 15 years of hands-on experience in freshwater and saltwater environments. As the founder of FishingStaff, Tony is committed to demystifying fishing gear for beginners and budget-conscious anglers who refuse to compromise on quality. Learn more about Tony & find him on Twitter. Happy reading!